I am so excited to show you all the before and after photos of our
White House on the Prairie! We purchased it in October,
got right to work,
finished renovations at the the end of February and moved in at the beginning of March. We finally feel settled and only have a little more work to do here and there (painting a piece of furniture, staining the mantle and hanging/decorating a few things). It was a slightly stressful and long process but we couldn't be happier with how it turned out! If anyone wants to hire me as an interior designer............I'm available! ;)
The yard......well.....how does one get on the show
Yard Crashers?! Ha! But seriously. We have big plans and dreams (and we made a ton of progress clearing out some of the over grown areas) but we have a LONG way to go! We are in the process of converting the Koi Pond to a fire pit and adding a patio floor on the side of the house. We also want to start utilizing the garden area but we have to block it off from the dogs first......they think it's their own personal digging pit. Eye roll.
Ok, ok. Enough chit-chat. Here are the before and afters!
 |
| We didn't change anything on the outside....yet. I want to take out the stupid wheat tuff, cut back the bushes on the left side and add a flower bed and a little Charlie Brown Christmas tree. In due time! Excuse the blue grass - we just had it sprayed! |
 |
| BEFORE: Entry |
 |
| AFTER: Entry - We knocked down the wall separating the entry and living area, switched out the entry light and painted! |
 |
| AFTER: Entry - I want to paint this piece of furniture.....who wants to help? |
 |
| BEFORE: Entry, looking into living from stairs |
 |
| AFTER: Entry, looking into living from stairs |
 |
| BEFORE: Living |
 |
| AFTER: Living - We knocked out the wall separating the entry and living room, added recessed lighting, re-did the fireplace and mantle and painted! |
 |
| BEFORE: Living |
 |
| AFTER: Living |
 |
| BEFORE: Sunroom |
 |
| AFTER: Sunroom - We ripped up the carpet to find gross grocery store tiles. We attempted to pour a garage-type floor over the tiles but it didn't work very well. We will eventually tear it out and put down stained concrete, but for now a dirty dog rug will do! This room is used as the "dog/mud room," so pardon the dirt! |
 |
| BEFORE: Dining |
 |
| AFTER: Dining - We knocked down part of the wall separating the living room from the dining room to widen the opening. We also knocked down the wall separating the dining room from the kitchen and added a bar. Both of these required beams to be added over head. We also updated the pendant light above the dining room table. And paint, obviously. |
 |
| AFTER: Dining - The framed document declares our 1920 home to on the national list of historical places! How cool is that? And how cute is this bar cart?!! |
 |
| AFTER: Dining - I found this hutch on Craigslist for dirt cheap. It was filthy and red, but I cleaned, sanded it and painted it - I absolutely love how it turned out! I just need to add some glass knobs to the cabinet doors. Luckily we have some salvaged from an upstairs cabinet we tore out so they will be original to the home! |
 |
| AFTER: Dining |
 |
| AFTER: Dining - #findcole |
 |
| BEFORE: Kitchen....I mean, yuck. |
 |
| AFTER: Kitchen - We removed the wall separating the dining room from the kitchen and added a bar. We also exposed the brick chimey, relocated the fridge and added built in cabinets, new counter tops, a coffee bar and a custom vent hood! |
 |
| BEFORE: Kitchen |
 |
| AFTER: Kitchen - We rearranged the cabinets to be one long piece. We ripped out the uppers, added a subway tile backsplash and open shelving, and got the cutest farm house sink! We also updated the lights everywhere and installed a window in the back door. |
 |
| BEFORE: Kitchen |
 |
| AFTER: Kitchen - We added a custom vent hood cover and island/bar with a built-in microwave. We also added hanging lights above the bar! |
 |
| BEFORE: Kitchen - looking from stairs |
 |
| AFTER: Kitchen - We tore out the nasty tile and added wood floors, stained to match the original wood floors in the rest of the house. |
 |
| AFTER: Kitchen - This is where the fridge used to be. We put in cabinets and created a coffee bar! |
 |
| AFTER: Kitchen - We relocated the fridge and added custom built-in cabinets surrounding it with pull out spice drawers. We did close off a window behind the fridge, but since we added a window in the back door, we didn't lose any light. Artwork courtesy of Miss Leighton Love :) |
 |
| AFTER: Kitchen - The glass door (original to the home) leads to the 1/2 bath and basement! |
 |
| AFTER: 1/2 bath - I'm not sure how I don't have a before picture......but it was dingy and gross! We exposed the brick, added a new sink (the tiniest and cutest sink in the whole world) and repurposed the cabinet (it used to be a spice cabinet in the kitchen). We also put in new floor tile, a new mirror and a chandelier! |
 |
| BEFORE: Landing |
 |
| AFTER: Landing - Due to combining two bedrooms to make a master suite, we closed off a door and removed the built-in cabinets. |
 |
| BEFORE: Guest Room - these colors......I can't |
 |
| AFTER: Guest Room - This room only needed to be painted! This is literally the only room Cole and I painted ourselves, ha! It was hard work covering up that mustard yellow and dark green (plus the gross texture!), but it looks night and day better. |
 |
| BEFORE: Guest Room |
 |
| AFTER: Guest Room - Now taking reservations! |
 |
| BEFORE: Office |
 |
| AFTER: Office - This room only needed a fresh coat of paint, as well! |
 |
| AFTER: Office - I had so much fun decorating this room! I tried to branch out from my usual Farm House/Industrial style and I love the way it turned out. |
 |
| AFTER: Office |
 |
| AFTER: Office |
 |
| BEFORE: Guest Bath....Yes, that is a urinal. |
 |
| AFTER: Guest Bath - Bye, Bye, Urinal! We gutted this bath to the studs. We got rid of the stand up shower and made the tub a shower-tub combo. We put in new subway tile in the shower and new hex-tile on the floor. We got a new pedestal sink, mirror and cabinet and updated the light fixtures as well as adding bead board trim. And of course, paint!! We still need to buy blinds to fit the window....oops! |
 |
| AFTER: Guest Bath - Removing the shower left a little bit of an awkward space. I found these vintage lockers on Craigslist for super cheap. They were bright blue, but I cleaned them up and spray painted them! Now they serve as storage. |
 |
| BEFORE: Master Bedroom....the trim paint was rusty orange. I mean, really? |
 |
| AFTER: Master Bedroom - Paint does wonders! We also removed the wall separating the bedroom and closet to expand the space. We added a door to enter the master closet and bathroom. |
 |
| BEFORE: Master Bedroom |
 |
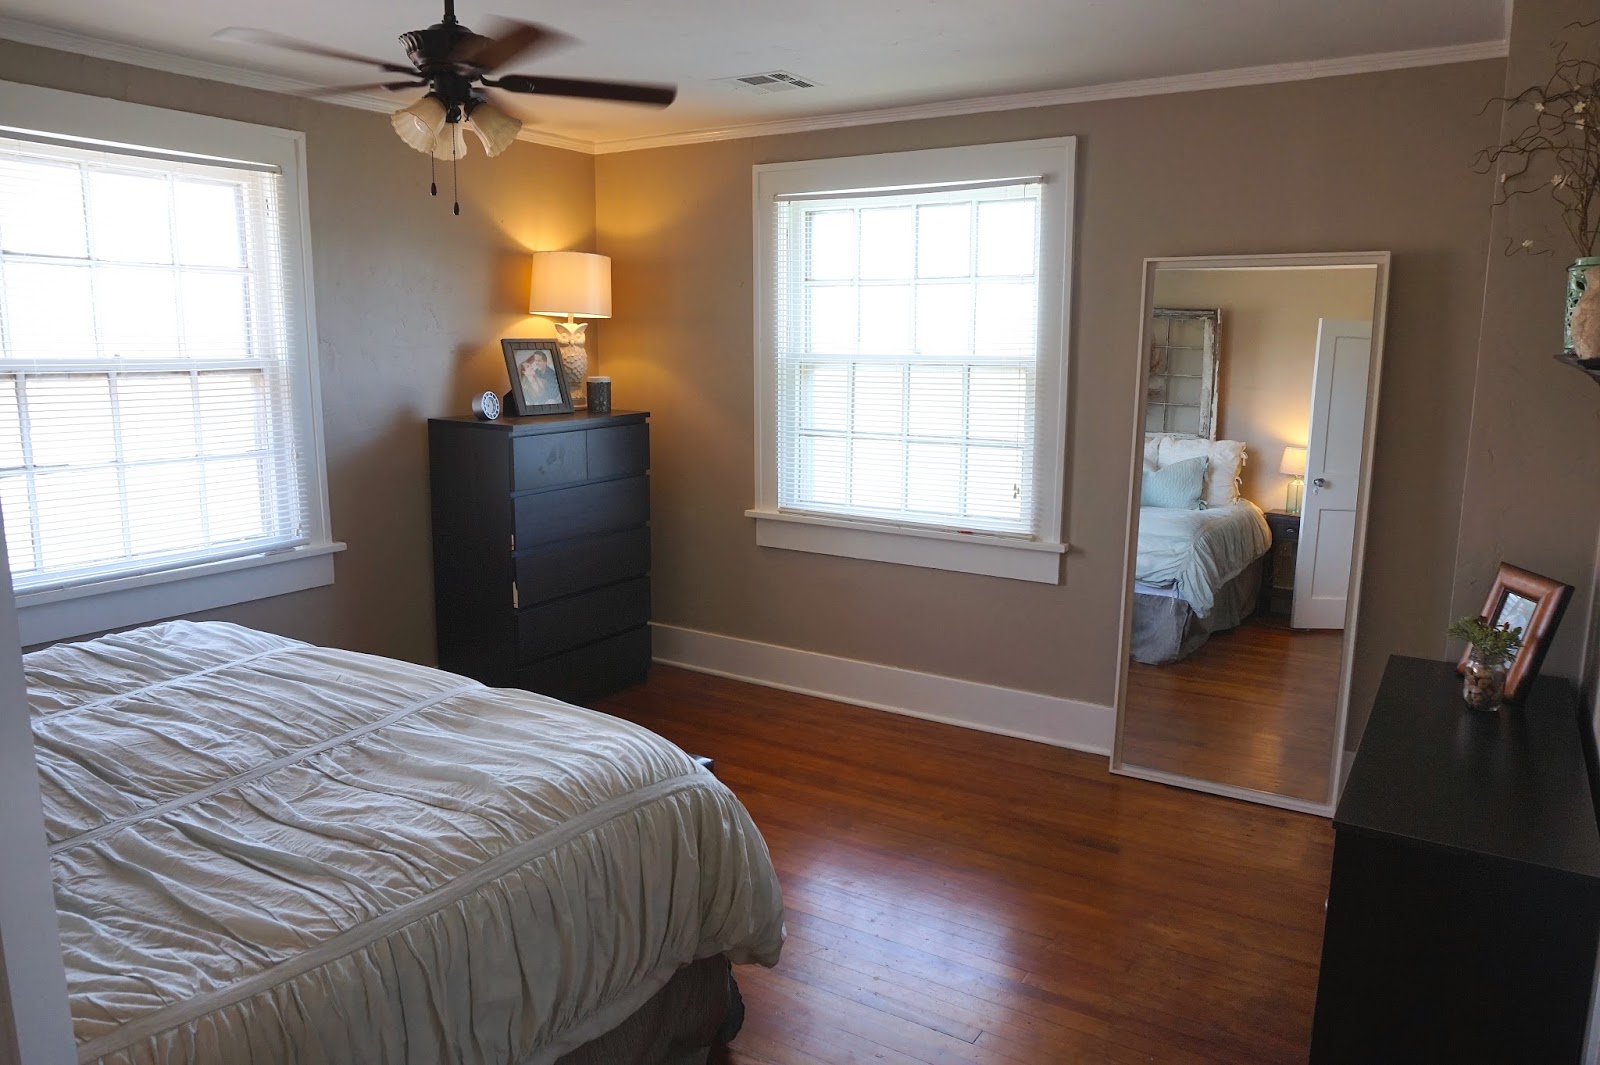
| AFTER: Master Bedroom - If you notice, we put the door at an angle to give it a little bit more character! |
 |
| AFTER: Master Bedroom |
 |
| BEFORE: Master Closet |
 |
| AFTER: Master Closet - We turned the fourth bedroom into a master bath/walk-in closet suite. This half is the closet! With a window! I'm in heaven. Excuse the dirty rug.....Kylo likes to lay on it.... |
 |
| AFTER: Master Closet |
 |
| AFTER: Master Closet - Note the chandelier! |
 |
| AFTER: Master Closet |
 |
| BEFORE: Master Bath |
 |
| AFTER: Master Bath - This was the most extensive part of our renovation since it had to be built from the ground up! |
 |
| AFTER: Master Bath - We exposed the brick, put in tile and bead board trim, added a shower, toilet and two sinks! |
 |
| AFTER: Master Bath - We fell in love with the tile in our bathroom in NYC last fall so we came home and bought it for our own shower floor! They are "penny rounds" and they feel so good on your feet! |
 |
| AFTER: Master Bath |
 |
| BEFORE: Backyard |
 |
| AFTER: Backyard - OK, this is still a major work in progress, don't judge. |
 |
| BEFORE: Backyard |
 |
| AFTER: Backyard - As you can see, we cleaned out a LOT of the trees and shrubs that had overgrown the back half of the yard. We still have some landscaping to do! We are also turning the Koi Pond (the brick circle) into a fire pit and working to update the garden (back right cylinder block square) to make it prettier and functional/dog proof. |
 |
| AFTER: Backyard - I plan on filling in the rocky area and adding bistro lights so we can dine on the back porch! |
 |
| AFTER: Backyard - We are adding a crushed granite patio floor here; it will be right off the sunroom and perfect for summer drinks! It will also keep it from getting muddy. Kylo approves. Chloe....not so much. |
Whew!!! I think that was the most pictures I have ever put in a blog post. If you stuck around till the end, I applaud you! Again, we couldn't be happier with how the #WhiteHouseOnThePrairie turned out. I love coming home every day and am still in shock that I live in a perfect house in a perfect neighborhood - hashtag blessed. I don't think I want to move again for a loooooooonnnnnggggg time, but I definitely wouldn't be opposed to renovating another house in the future. It was such a rewarding process and a fun project for Cole and I to tackle together as a team.
Thank you so much for reading and for for being a part of the renovation process from start to finish!